Automatization of IGV snapshots
Ever since I started analyzing Transposable Elements (TEs) expression in RNA-Seq data, I have been curious to see the genomic coverage of specific loci. Moreover, when I found out that SQuIRE, one of the best tools at the moment, could generate thousands of false positives, I was more aware of the need to manually verify the expression of TEs. Since there was a large amount of loci to check, I would always postpone this task, as I was never able to find an automated way of generating genomic coverage snapshots. Instead, after several statistical analyses, I would try to shorten the list of TEs to the smallest amount possible, so I could later check them one-by-one on the Integrative Genomics Viewer (IGV) application.
It wasn’t until a few weeks ago that I decided to attempt this again. In turn, I was able to find this blog post with the backbone of the solution. Since then, I modified it to suit my needs for RNA-Seq analyses, and decided to write this post as a more definite tutorial that goes from scratch to the final generation of these long-coveted automated IGV snapshots.
1. What you will need
- Command line IGV 2.16.2 (https://igv.org/)
- Samtools (https://www.htslib.org/)
- A genome FASTA file (for this tutorial, I'm using the mm10 FASTA from UCSC)
- A GTF file (for this tutorial, I'm using the mm10 NCBI RefSeq from UCSC)
- One or more BAM files (I'm using 2 BAM files here)
2. Generating the snapshots
There are two main steps to actually generating the IGV snapshots in an automated manner. First, we need to index the genome FASTA file, the genome annotation GTF file, and the BAM files.
To make things simpler, I recommend creating an environment variable that contains the path to the IGV command line directory:
export IGV_HOME=/path/IGV_2.16.2/
Then, to index the genome FASTA file, we can do it like this:
$IGV_HOME/igvtools index mm10.fa
For the GTF file, we need to sort it first, and then we can run the index command:
$IGV_HOME/igvtools sort mm10.ncbiRefSeq.gtf mm10.ncbiRefSeq_sorted.gtf
$IGV_HOME/igvtools index mm10.ncbiRefSeq_sorted.gtf
WARNING: Failure to index the GTF file, will result in long running times. Although the snapshot commands will work, when testing this tutorial on the unindexed file, it went for more than 26 minutes when loading it versus the ~1 minute it will take with the sorted and indexed version.
Finally, to index the BAM files, we can use samtools:
samtools index W8S1PA_Aligned.sortedByCoord.out.bam
samtools index W8S3SM_Aligned.sortedByCoord.out.bam
The second step is creating the IGV script that will be used to actually generate the snapshots. Here is the template I use now:
#load files
genome mm10.fa
load mm10.ncbiRefSeq_sorted.gtf

preference SAM.SHOW_ALIGNMENT_TRACK false

load W8S3SM_Aligned.sortedByCoord.out.bam
load W8S1PA_Aligned.sortedByCoord.out.bam

#create snapshots
snapshotDirectory .

goto chr3:83,764,321-83,776,316
snapshot igv_demo_sfrp2.png

exit
We can save this into the file igv_snapshot_demo.batch. The script basically consists of loading the genome files (FASTA and sorted GTF), then setting SAM.SHOW_ALIGNMENT_TRACK to false, as I don’t usually need to check the reads track, and loading the BAM files. Later, we define the snapshot directory, and through the goto and snapshot commands we are actually creating them.
Once all the above is done, we can run this final command to efficiently generate all the snapshots in one go:
xvfb-run --auto-servernum --server-num=1 java -showversion --module-path="${IGV_HOME}/lib" -Xmx8g @"${IGV_HOME}/igv.args" --module=org.igv/org.broad.igv.ui.Main -b igv_snapshot_demo.batch
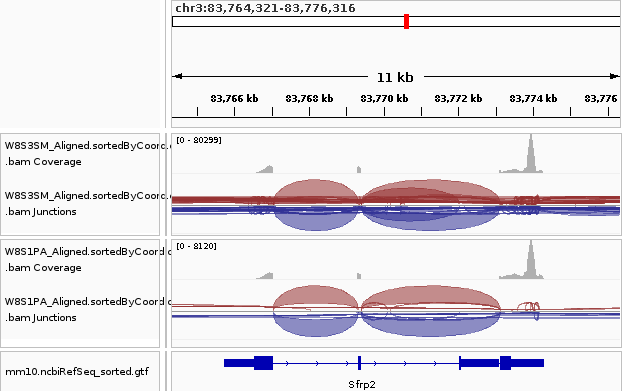
In this example, the generated snapshot will be:

With this, we can now finally generate snapshots for a large number of genomic locations in an automated manner!
Enjoy Reading This Article?
Here are some more articles you might like to read next: